Chat using Vivox
ここではVivoxラッパーについて学習します。
- 学習時間の目安
- 60分
- Unityバージョン
- 2022.3.17f1
Vivoxラッパーの学習では学習用に用意したプロジェクトを使います。 この学習用のプロジェクトはCoreの学習で構築したアプリケーションアーキテクチャをベースに作成しています。 Coreの学習を実施していない方はこの学習より先にCoreの学習を実施することを推奨します。
Vivoxラッパーがセットアップされた学習用のプロジェクトを使って、バーチャル空間でテキストチャットとボイスチャットをできるようにアプリケーションの実装を追加していきます。
この学習を行うにはクライアントからの接続先となるプロジェクトがUnity Cloudに必要です。 以降のハンズオンを始める前にUnity CloudでVivoxがセットアップされたプロジェクトを作成しておいてください。
Prepare project
まずはプロジェクトを準備しましょう。
学習用のプロジェクトをクローンします。
https://github.com/extreal-dev/Extreal.Learning.Chat.Vivox.git
Unityエディタでクローンしたプロジェクトを開きます。 「Link your Unity project」と表示された場合は設定せずに閉じてください。
プロジェクトの内容を確認しましょう。
AssetsディレクトリのExtrealCoreLearningディレクトリがアプリケーションのアセットを格納するディレクトリです。
ディレクトリ名と同じ名前でAssembly Definitionを作成して依存パッケージを制御しています。
ExtrealCoreLearningディレクトリの状態は次の通りです。
- タイトル画面とバーチャル空間を作成済みです。
- バーチャル空間はStarter Assets - Third Person Character Controllerが提供するアセットを使用しています。
- バーチャル空間にはテキストチャットとボイスチャットのUIを作成済みです。
- バーチャル空間でテキストチャットとボイスチャットを実現します。
プロジェクトに問題がないことを確認するためアプリケーションを実行してみましょう。
AppディレクトリにあるAppシーンを実行します。
タイトル画面のGoボタンを押してバーチャル空間に移動できれば成功です。
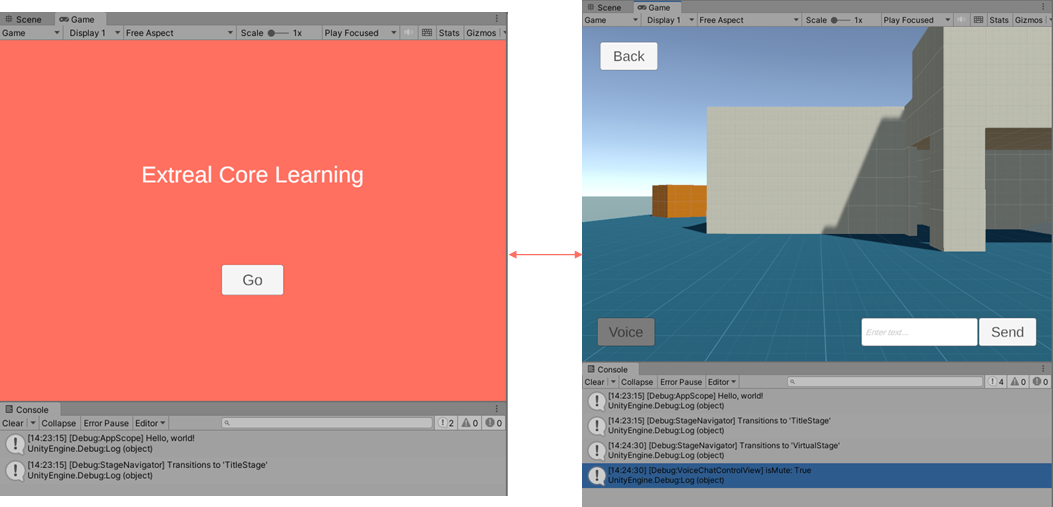
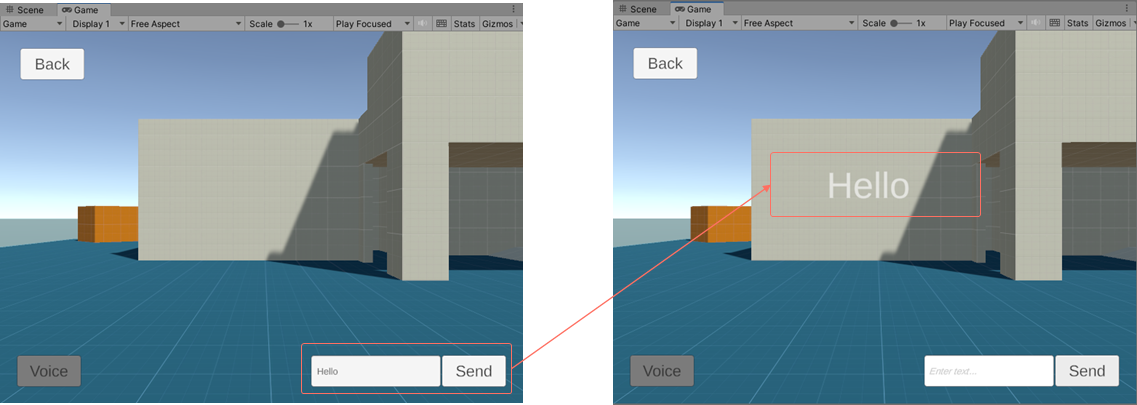
テキストチャットのUIを試してみましょう。 入力フィールドに適当なメッセージを入力し、Sendボタンを押してください。 メッセージが画面に現れます。
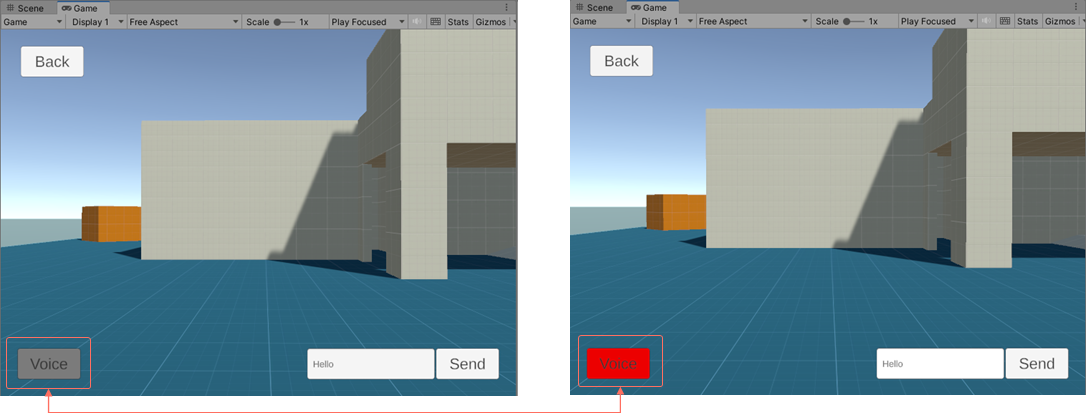
ボイスチャットのUIではミュート切り替えを行うボタンを用意しています。 画面左下のVoiceボタンを押してみてください。 ミュート状態に応じてボタンの色を変えています。 赤がミュート解除中、グレーがミュート中を表しています。
テキストチャットとボイスチャットのUI実装は次のディレクトリを確認してください。
- テキストチャット
ExtrealCoreLearning/TextChatControl - ボイスチャット
ExtrealCoreLearning/VoiceChatControl
バーチャル空間でテキストチャットとボイスチャットをできるように実装を追加していきます。
Add VivoxClient
まずVivoxClientを準備します。 VivoxClientはアプリケーションで1つ存在すればよいのでAppシーンに含めておき、空間が増えても再利用できるようにしておきます。
VivoxAppConfigを生成するScriptableObjectを作成します。
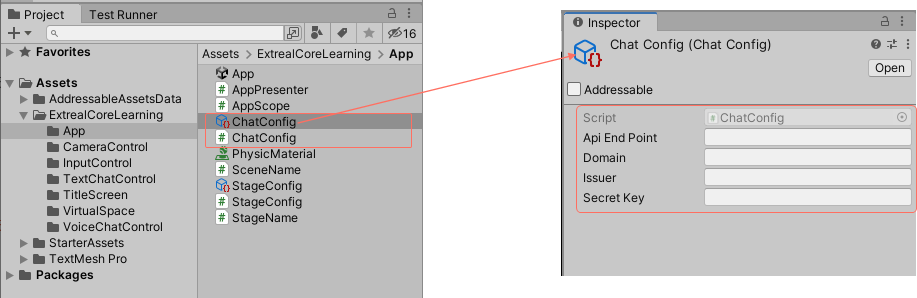
- VivoxラッパーのSettingsを参照して、AppディレクトリにVivoxAppConfigオブジェクトを生成するChatConfigスクリプトを作成します。
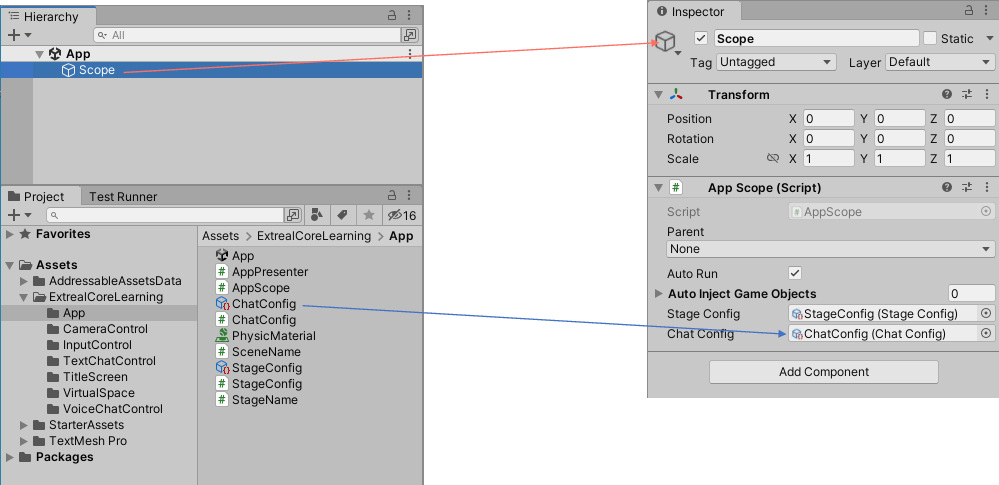
- アセット作成メニューからChatConfigオブジェクトを作成し、インスペクタでVivoxへの接続情報を設定します。
AppScopeを変更してVivoxClientを初期化します。
VContainerを使ってVivoxAppConfigをVivoxClientに設定しています。
using Extreal.Core.Logging;
using Extreal.Core.StageNavigation;
using Extreal.Integration.Chat.Vivox;
using UnityEngine;
using VContainer;
using VContainer.Unity;

namespace ExtrealCoreLearning.App
{
    public class AppScope : LifetimeScope
    {
        [SerializeField] private StageConfig stageConfig;
        [SerializeField] private ChatConfig chatConfig;

        private static void InitializeApp()
        {
            // Omitted due to no changes
        }

        protected override void Awake()
        {
            // Omitted due to no changes
        }

        protected override void Configure(IContainerBuilder builder)
        {
            builder.RegisterComponent(stageConfig).AsImplementedInterfaces();
            builder.Register<StageNavigator<StageName, SceneName>>(Lifetime.Singleton);

            builder.RegisterComponent(chatConfig.ToVivoxAppConfig());
            builder.Register<VivoxClient>(Lifetime.Singleton);

            builder.RegisterEntryPoint<AppPresenter>();
        }
    }
}
インスペクタでAppScopeにChatConfigオブジェクトを設定します。
AppPresenterを変更してVivoxサーバにログインします。
Vivoxではサーバにログインしてからチャンネルに参加します。 チャンネルへの参加前であればいつログインしても良いので最初にします。
using System.Threading;
using Cysharp.Threading.Tasks;
using Extreal.Core.StageNavigation;
using Extreal.Integration.Chat.Vivox;
using VContainer.Unity;

namespace ExtrealCoreLearning.App
{
    public class AppPresenter : IAsyncStartable
    {
        private StageNavigator<StageName, SceneName> stageNavigator;
        private VivoxClient vivoxClient;

        public AppPresenter
        (
            StageNavigator<StageName, SceneName> stageNavigator,
            VivoxClient vivoxClient
        )
        {
            this.stageNavigator = stageNavigator;
            this.vivoxClient = vivoxClient;
        }

        public async UniTask StartAsync(CancellationToken cancellation)
        {
            vivoxClient.LoginAsync(new VivoxAuthConfig(nameof(ExtrealCoreLearning))).Forget();
            await stageNavigator.ReplaceAsync(StageName.TitleStage);
        }
    }
}
Add text chat
VivoxClientが準備できたのでテキストチャットを追加していきます。
テキストチャットのロジックを提供するModelスクリプトを作成します。
ExtrealCoreLearning/TextChatControlディレクトリに作成します。 チャンネルへの参加とチャンネルからの退室、メッセージ送信とメッセージ受信を提供しています。
using System;
using Cysharp.Threading.Tasks;
using Extreal.Core.Common.System;
using Extreal.Integration.Chat.Vivox;
using UniRx;
using VivoxUnity;

namespace ExtrealCoreLearning.TextChatControl
{
    public class TextChatChannel : DisposableBase
    {
        private readonly VivoxClient vivoxClient;
        private readonly string channelName;

        private ChannelId channelId;

        private readonly CompositeDisposable disposables = new CompositeDisposable();

        public IObservable<string> OnMessageReceived
            => vivoxClient.OnTextMessageReceived.Select(channelTextMessage => channelTextMessage.Message);

        public TextChatChannel(VivoxClient vivoxClient, string channelName)
        {
            this.vivoxClient = vivoxClient;
            this.channelName = channelName;
        }

        public async UniTask JoinAsync()
            => channelId = await vivoxClient.ConnectAsync(
                new VivoxChannelConfig(channelName, ChatType.TextOnly, transmissionSwitch: false));

        public void Leave()
        {
            if (ChannelId.IsNullOrEmpty(channelId))
            {
                return;
            }
            vivoxClient.Disconnect(channelId);
        }

        public void SendMessage(string message)
            => vivoxClient.SendTextMessage(message, channelId);

        protected override void ReleaseManagedResources()
            => disposables.Dispose();
    }
}
TextChatChannelを使うようにTextChatControlPresenterを変更します。
ステージに入った時にTextChatChannelを生成してチャンネルに参加し、ステージから出るときにチャンネルから退室しています。 メッセージの送信と受信はViewスクリプトのTextChatControlViewとModelスクリプトのTextChatChannelをマッピングして実現しています。
using Cysharp.Threading.Tasks;
using Extreal.Core.Common.System;
using Extreal.Core.StageNavigation;
using Extreal.Integration.Chat.Vivox;
using ExtrealCoreLearning.App;
using UniRx;
using VContainer.Unity;

namespace ExtrealCoreLearning.TextChatControl
{
    public class TextChatControlPresenter : DisposableBase, IInitializable
    {
        private readonly StageNavigator<StageName, SceneName> stageNavigator;
        private readonly VivoxClient vivoxClient;
        private readonly TextChatControlView textChatControlView;
        private readonly CompositeDisposable disposables = new CompositeDisposable();
        private TextChatChannel textChatChannel;
        private readonly CompositeDisposable stageDisposables = new CompositeDisposable();

        public TextChatControlPresenter(
            StageNavigator<StageName, SceneName> stageNavigator,
            VivoxClient vivoxClient,
            TextChatControlView textChatControlView)
        {
            this.stageNavigator = stageNavigator;
            this.vivoxClient = vivoxClient;
            this.textChatControlView = textChatControlView;
        }

        public void Initialize()
        {
            stageNavigator.OnStageTransitioned
                .Subscribe(OnStageEntered).AddTo(disposables);

            stageNavigator.OnStageTransitioning
                .Subscribe(OnStageExiting).AddTo(disposables);

            textChatControlView.OnSendButtonClicked.Subscribe(message =>
            {
                textChatChannel.SendMessage(message);
            }).AddTo(disposables);
        }

        private void OnStageEntered(StageName stageName)
        {
            textChatChannel = new TextChatChannel(vivoxClient, $"TextChat-{stageName}");
            textChatChannel.OnMessageReceived.Subscribe(message =>
            {
                textChatControlView.ShowTextChatMessage(message);
            }).AddTo(stageDisposables);
            textChatChannel.JoinAsync().Forget();
        }

        private void OnStageExiting(StageName stageName)
        {
            textChatChannel.Leave();
            textChatChannel.Dispose();
            stageDisposables.Clear();
        }

        protected override void ReleaseManagedResources()
        {
            stageDisposables.Dispose();
            disposables.Dispose();
        }
    }
}
テキストチャットをプレイしてみましょう。
テキストチャットの動作確認にはParrelSyncを使います。 プロジェクトにParrelSyncをインストールしてあるので、ParrelSyncを使って複数のUnityエディタを開いてプレイしてみましょう。
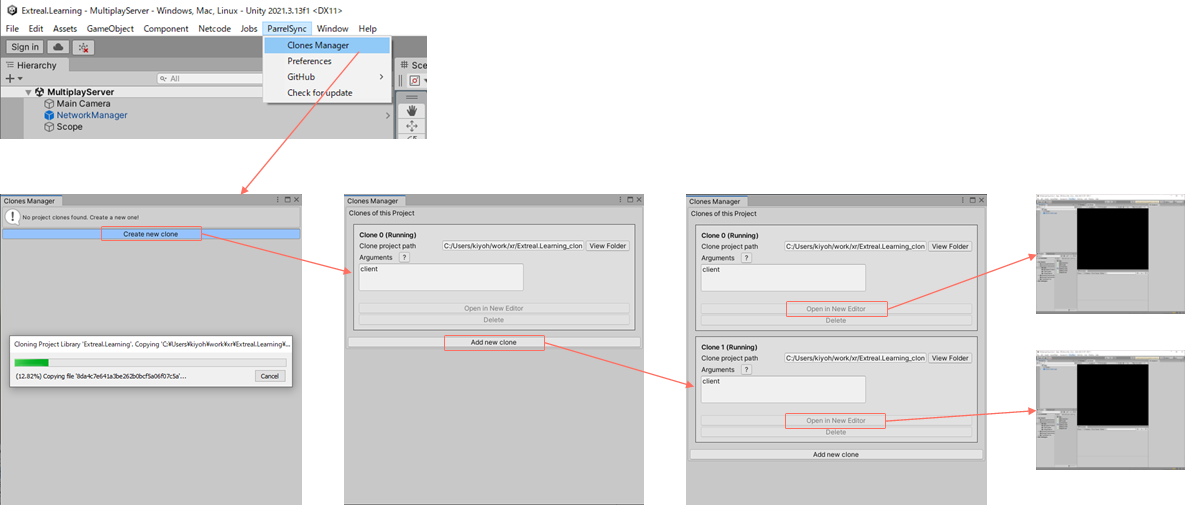
Appシーンを実行します。 Vivoxへの接続に少し時間がかかるので実行後すぐにメッセージ送信しても送信されない場合があります。 メッセージ送信が反応しなかった場合は少し待ってからメッセージ送信してください。
実行しているすべてのアプリケーションにメッセージが送信されれば成功です。
Add base class
ボイスチャットを追加する前に、テキストチャットとボイスチャットのModelスクリプトとPresenterスクリプトは共通する部分が多いのでBaseクラスに共通処理を切り出します。 共通処理は次の通りです。
- Modelスクリプト
- チャンネルへの参加とチャンネルからの退室
- Presenterスクリプト
- ステージに入った時にTextChatChannelを生成してチャンネルに参加し、ステージから出るときにチャンネルから退室
ModelスクリプトのBaseクラスを作成します。
Appディレクトリに作成します。
using Cysharp.Threading.Tasks;
using Extreal.Core.Common.System;
using Extreal.Integration.Chat.Vivox;
using UniRx;
using VivoxUnity;

namespace ExtrealCoreLearning.App
{
    public abstract class ChatChannelBase : DisposableBase
    {
        protected readonly VivoxClient VivoxClient;
        protected readonly string ChannelName;
        protected ChannelId ChannelId;

        protected readonly CompositeDisposable Disposables = new CompositeDisposable();

        protected ChatChannelBase(VivoxClient vivoxClient, string channelName)
        {
            VivoxClient = vivoxClient;
            ChannelName = channelName;
        }

        public async UniTask JoinAsync()
            => ChannelId = await VivoxClient.ConnectAsync(CreateChannelConfig(ChannelName));

        protected abstract VivoxChannelConfig CreateChannelConfig(string channelName);

        public void Leave()
        {
            if (ChannelId.IsNullOrEmpty(ChannelId))
            {
                return;
            }

            VivoxClient.Disconnect(ChannelId);
        }

        protected override void ReleaseManagedResources()
            => Disposables.Dispose();
    }
}
Baseクラスを使うようにTextChatChannelを変更します。
using System;
using Cysharp.Threading.Tasks;
using Extreal.Integration.Chat.Vivox;
using ExtrealCoreLearning.App;
using UniRx;

namespace ExtrealCoreLearning.TextChatControl
{
    public class TextChatChannel : ChatChannelBase
    {
        public IObservable<string> OnMessageReceived
            => VivoxClient.OnTextMessageReceived.Select(channelTextMessage => channelTextMessage.Message);

        public TextChatChannel(VivoxClient vivoxClient, string channelName) : base(vivoxClient, channelName)
        {
        }

        protected override VivoxChannelConfig CreateChannelConfig(string channelName)
            => new VivoxChannelConfig(channelName, ChatType.TextOnly, transmissionSwitch: false);

        public void SendMessage(string message)
            => VivoxClient.SendTextMessage(message, ChannelId);
    }
}
PresenterスクリプトのBaseクラスを作成します。
Appディレクトリに作成します。
using Extreal.Core.Common.System;
using Extreal.Core.StageNavigation;
using UniRx;
using VContainer.Unity;

namespace ExtrealCoreLearning.App
{
    public abstract class ControlPresenterBase : DisposableBase, IInitializable
    {
        private readonly StageNavigator<StageName, SceneName> stageNavigator;
        private readonly CompositeDisposable sceneDisposables = new CompositeDisposable();
        private CompositeDisposable stageDisposables = new CompositeDisposable();

        protected ControlPresenterBase(
            StageNavigator<StageName, SceneName> stageNavigator)
        {
            this.stageNavigator = stageNavigator;
        }

        public void Initialize()
        {
            stageNavigator.OnStageTransitioned.Subscribe(stageName =>
            {
                OnStageEntered(stageName, stageDisposables);
            }).AddTo(sceneDisposables);

            stageNavigator.OnStageTransitioning.Subscribe(stageName =>
            {
                OnStageExiting(stageName);
                stageDisposables.Clear();
            }).AddTo(sceneDisposables);

            Initialize(stageNavigator, sceneDisposables);
        }

        protected abstract void Initialize(
            StageNavigator<StageName, SceneName> stageNavigator, CompositeDisposable sceneDisposables);

        protected abstract void OnStageEntered(
            StageName stageName, CompositeDisposable stageDisposables);

        protected abstract void OnStageExiting(StageName stageName);

        protected override void ReleaseManagedResources()
        {
            stageDisposables.Dispose();
            sceneDisposables.Dispose();
        }
    }
}
Baseクラスを使うようにTextChatControlPresenterを変更します。
using Cysharp.Threading.Tasks;
using Extreal.Core.StageNavigation;
using Extreal.Integration.Chat.Vivox;
using ExtrealCoreLearning.App;
using UniRx;

namespace ExtrealCoreLearning.TextChatControl
{
    public class TextChatControlPresenter : ControlPresenterBase
    {
        private readonly VivoxClient vivoxClient;
        private readonly TextChatControlView textChatControlView;
        private TextChatChannel textChatChannel;

        public TextChatControlPresenter(
            StageNavigator<StageName, SceneName> stageNavigator,
            VivoxClient vivoxClient,
            TextChatControlView textChatControlView) : base(stageNavigator)
        {
            this.vivoxClient = vivoxClient;
            this.textChatControlView = textChatControlView;
        }

        protected override void Initialize(
            StageNavigator<StageName, SceneName> stageNavigator,
            CompositeDisposable sceneDisposables)
        {
            textChatControlView.OnSendButtonClicked
                .Subscribe(message =>
                {
                    textChatChannel.SendMessage(message);
                }).AddTo(sceneDisposables);
        }

        protected override void OnStageEntered(
            StageName stageName,
            CompositeDisposable stageDisposables)
        {
            textChatChannel = new TextChatChannel(vivoxClient, $"TextChat-{stageName}");
            textChatChannel.OnMessageReceived
                .Subscribe(message =>
                {
                    textChatControlView.ShowTextChatMessage(message);
                }).AddTo(stageDisposables);
            textChatChannel.JoinAsync().Forget();
        }

        protected override void OnStageExiting(StageName stageName)
        {
            textChatChannel.Leave();
            textChatChannel.Dispose();
        }
    }
}
Appシーンを実行して変更前と同じようにテキストチャットがプレイできれば成功です。
Add voice chat
ボイスチャットを追加していきます。
BaseクラスとVivoxClientを使うようにModelスクリプトのVoiceChatChannelを変更します。
VivoxClientを使って入力デバイスのミュート制御を行っています。
using System;
using Cysharp.Threading.Tasks;
using Extreal.Integration.Chat.Vivox;
using ExtrealCoreLearning.App;
using UniRx;

namespace ExtrealCoreLearning.VoiceChatControl
{
    public class VoiceChatChannel : ChatChannelBase
    {
        public IObservable<bool> IsMute => isMute.AddTo(Disposables);
        private ReactiveProperty<bool> isMute = new ReactiveProperty<bool>(true);

        public VoiceChatChannel(VivoxClient vivoxClient, string channelName) : base(vivoxClient, channelName)
            => SetMuteAsync(true).Forget();

        protected override VivoxChannelConfig CreateChannelConfig(string channelName)
            => new VivoxChannelConfig(channelName, ChatType.AudioOnly);

        public UniTask ToggleMuteAsync()
            => SetMuteAsync(!isMute.Value);

        private async UniTask SetMuteAsync(bool muted)
        {
            var audioInputDevices = await VivoxClient.GetAudioInputDevicesAsync();
            audioInputDevices.Muted = muted;
            isMute.Value = muted;
        }
    }
}
BaseクラスとVoiceChatChannelを使うようにVoiceChatControlPresenterを変更します。
using Cysharp.Threading.Tasks;
using Extreal.Core.StageNavigation;
using Extreal.Integration.Chat.Vivox;
using ExtrealCoreLearning.App;
using UniRx;

namespace ExtrealCoreLearning.VoiceChatControl
{
    public class VoiceChatControlPresenter : ControlPresenterBase
    {
        private readonly VivoxClient vivoxClient;
        private readonly VoiceChatControlView voiceChatControlView;
        private VoiceChatChannel voiceChatChannel;

        public VoiceChatControlPresenter(
            StageNavigator<StageName, SceneName> stageNavigator,
            VivoxClient vivoxClient,
            VoiceChatControlView voiceChatControlView) : base(stageNavigator)
        {
            this.vivoxClient = vivoxClient;
            this.voiceChatControlView = voiceChatControlView;
        }

        protected override void Initialize(
            StageNavigator<StageName, SceneName> stageNavigator, CompositeDisposable sceneDisposables)
        {
            voiceChatControlView.OnVoiceButtonClicked.Subscribe(_ =>
            {
                voiceChatChannel.ToggleMuteAsync().Forget();
            }).AddTo(sceneDisposables);
        }

        protected override void OnStageEntered(StageName stageName, CompositeDisposable stageDisposables)
        {
            voiceChatChannel = new VoiceChatChannel(vivoxClient, $"VoiceChat-{stageName}");
            voiceChatChannel.IsMute.Subscribe(isMute =>
            {
                voiceChatControlView.toggleMute(isMute);
            }).AddTo(stageDisposables);
            voiceChatChannel.JoinAsync().Forget();
        }

        protected override void OnStageExiting(StageName stageName)
        {
            voiceChatChannel.Leave();
            voiceChatChannel.Dispose();
        }
    }
}
ボイスチャットをプレイしてみましょう。
ParrelSyncを使って複数のUnityエディタを開いてプレイしてみましょう。
Appシーンを実行します。 ミュート切り替え、実行しているすべてのアプリケーションに音声が送信されれば成功です。
Next Step
これでVivoxラッパーのハンズオンは終了です。 お疲れさまでした。
このハンズオンを通じてVivoxラッパーを使ったテキストチャットとボイスチャットの作り方を体験しました。 次のステップとしてVivoxラッパーがより本格的なアプリケーションでどのように使われるのか関心があると思います。 その期待に応えるため、より本格的な実装例としてSample Applicationを提供しています。 ぜひSample Applicationをご覧ください。