Development Guide
Project
Directory structure
Overview
- Assets
- AddressableAssetsData
- Settings for using Addressables
- Analyzer
- Settings for using Code Cracker
- Google Fonts
- Unity font assets created from Noto Sans Japanese
- Holiday
- Assets created in the Holiday application
- Holiday.MultiplayCommon
- Assets common to the Holiday application and the multiplayer server
- Holiday.MultiplayServer
- Assets created by Holiday's multiplayer server
- Holiday.PerformanceTest
- Materials for performance testing in Holiday
- Mixamo
- Unity character models created from Mixamo
- Plugins
- Configuration files for Android builds
- StarterAssets
- TextMesh Pro
- Settings for using TextMesh Pro
- URP
- Configuration for using Universal Render Pipeline
- AddressableAssetsData
- Packages
- Unity packages for application development
We have a directory named starting with Holiday where we store our own assets. This is to make it easier to distinguish between assets created by third parties and ourselves. Directories other than Holiday are settings created for third parties or when using Unity features. We have set up directories for applications, so all other directories have been created or named with names that identify them as third-party.
Holiday
- App.
- Application entry point
- Application-wide settings/status
- Common
- Processing common to the entire application
- Controls
- XxxControl
- Control scene. Assets for each scene are placed together.
- Common
- Processing common to all Control scenes.
- XxxControl
- Screens
- XxxScreen
- Screen scene. Assets for each scene are placed together.
- Common
- UI and processing common to all Screen scenes.
- XxxScreen
- Spaces
- XxxSpace
- Space scene. Assets for each scene are placed together.
- Common
- UI and processing common to all Space scenes.
- XxxSpace
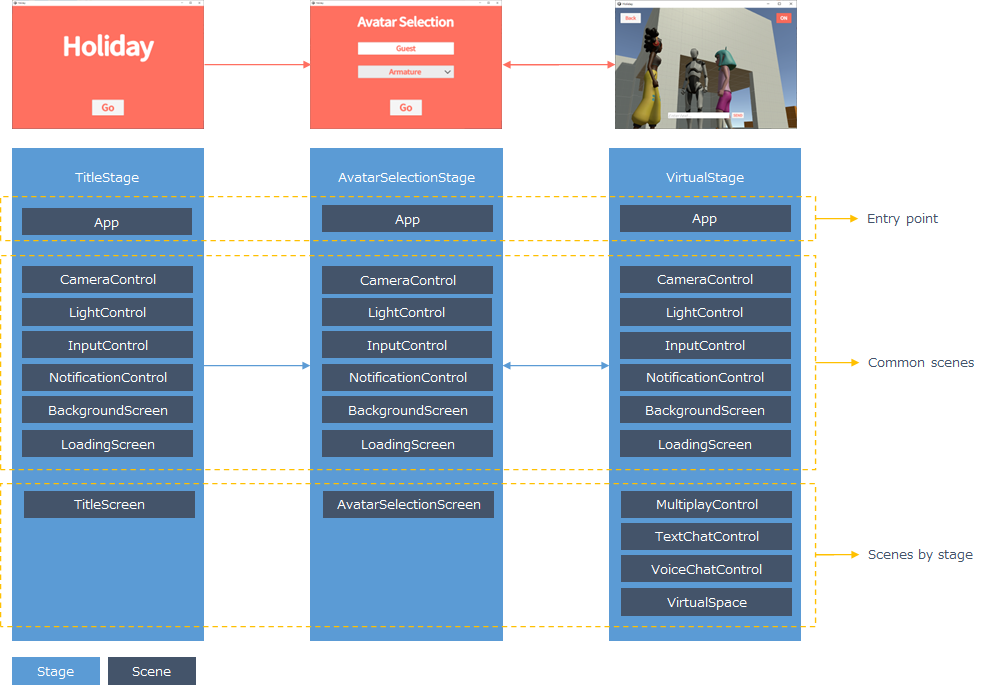
In many Unity applications, directories are divided by asset type, but since the assets that make up a single feature are scattered and difficult to find, Holiday will divide the directories by scene and place the assets for each scene together.
The application structure is shown below so that the correspondence between directories and scenes can be understood.
Static analysis
Analyzer is configured in .editorconfig directly under root.
Edit the script using an editor that supports EditorConfig and make sure there are no problems with Analyzer before pushing.
Assembly Definition(AD)
Create one AD per application unit.
- To limit third-party packages used in the application
- To facilitate the introduction of automated testing
- To apply Code Cracker
- To apply Code Cracker, the AD to be checked must include Code Cracker.
File settings
Scripts and configuration files should have the following settings to avoid unintended change differences.
- Encoding:
UTF-8 with BOM - Newline code:
LF
It is set as UTF-8 with BOM because UTF-8 without BOM cannot be set in Visual Studio.
Application
Entry point
The entry point for the application is the following scene.
Assets/Holiday/App/App
Initialization
The initialization processing of the application is performed by InitializeApp in the following script. InitializeApp is called at the beginning of Awake.
Assets/Holiday/App/AppScope
It sets the frame rate and Logging settings.
Stage configuration
Three types of stage configurations are created as shown in Stage Navigation Settings. Change them when you create a stage or scene.
Assets/Holiday/App/Config/StageName
Assets/Holiday/App/Config/SceneName
Assets/Holiday/App/Config/StageConfig
Application state
The class to hold the application state is provided. It is used to hold the player's name, selected avatar, and information across scenes.
Assets/Holiday/App/AppState
Utility class
Processing common to the entire application is provided as utility classes.
Assets/Holiday/App/AppUtils
Objects
Use VContainer to manage the objects used in each scene.
DI
For more information on DI, see What is DI ?.
There are several ways to do DI. VContainer recommends the following methods.
- C# Type
- MonoBehaviour
See RECOMMENDATION in Constructor Injection for VContainer's recommended reasons.
The following Register is used to register to VContainer.
builder.Register<AppState>(Lifetime.Singleton);
builder.RegisterComponent(networkManager);
RegisterInstance and RegisterComponent can be used to register instances such as MonoBehaviour, but RegisterComponent should be used. RegisterInstance does not perform DI on the argument object, so if you mistakenly specify an object for which you want to use DI, it may take some time to resolve the problem.
builder.RegisterEntryPoint<AppPresenter>();
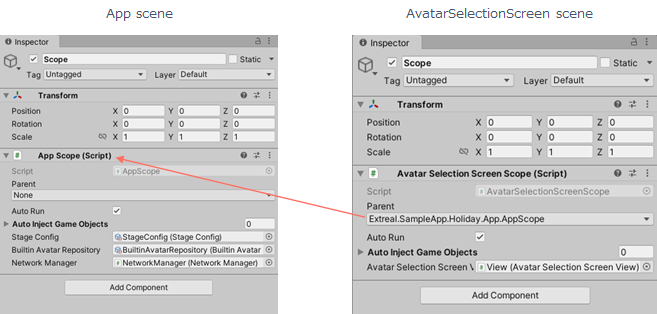
Scope
In VContainer, an object attached to a class that extends LifetimeScope is placed in a scene, which represents one scope (one container). By specifying the scope of the parent in the scope, the object search can be extended to the parent. Holiday uses the parent scope specification to make objects in the App scene available to each scene. Holiday's scope hierarchy is as follows.
App scene
↑
Each scene (Control scene, Screen scene, Space scene)
Specify the scope of the App scene as the parent of each scene scope.
Assets
Currently, all assets are included in the application, but if the content volume increases, it is assumed that the content will be externalized so that only the necessary content can be downloaded and used in the application. This is to reduce the download time by reducing the size of the application and the case where only the content needs to be changed.
Holiday uses Addressables in Unity for asset management. Addressables are used for the following purposes.
- Name the assets to be used and retrieve them in the application without relying on physical paths
- Switch from local to remote fetching of assets without modifying the application source code
The rules for naming assets are as follows.
Type + Name

(Example)
AvatarAmy
AvatarMichelle
Scenes
Design policy
The following is a design policy for scenes. Each scene should be created according to this design policy. By unifying the way each scene is created, we aim to create an application that is easy to maintain.
- Scenes are created using the MV(R)P pattern
- Models used throughout the application will be managed in the scope of App scenes
- StageNavigator, AppState, repositories for data access, NetworkManager, etc.
- Use AppState to exchange information across scenes
- Models used only in each scene are managed in the scope of each scene
- MultiplayRoom, TextChatChannel, etc.
- The scene loading/unloading process is handled by IInitializable/IDisposable
- This is done by implementing IInitializable/IDisposable in Presenter
- Note that the timing when IInitializable/IDisposable is called is not the timing of stage transitions. If the same scene continues at the stage transition, the scene is reused and IIInitializable/IDisposable is not called
- StageNavigator's event notification is used for processing at stage transitions
- Implement IInitializable in Presenter to register StageNavigator's event subscription
- If you want to perform processing for each space, such as connecting/disconnecting to a multiplayer room or text chat channel, implement it as a processing at the time of stage transition
Base class for Presenter
A base class is provided for the processing calls during stage transitions, as this processing is common to all presenter scripts in each scene. Presenter scripts should use this Base class.
Assets/Holiday/App/Common/StagePresenterBase
The Base class provides the following common processing.
- Calls for initialization when the scene is loaded
- Calls for processing when entering and exiting the stage
- Call to Dispose when exiting the stage
- Call to Dispose when the scene is unloaded
The following is a template for a Presenter script that inherits from the Base class.
public class XxxxxPresenter : StagePresenterBase
{

    public XxxxxPresenter(StageNavigator<StageName, SceneName> stageNavigator) : base(stageNavigator)
    {
        // Constructor
        // Pass StageNavigator to the Base class.
        // Receive the objects needed for the scene via constructor injection.
    }

    protected override void Initialize(StageNavigator<StageName, SceneName> stageNavigator, CompositeDisposable sceneDisposables)
    {
        // Implement the initialization processing here when the scene is loaded.
        // Add objects to sceneDisposables that you want to dispose of when unloading the scene.
    }

    protected override void OnStageEntered(StageName stageName, CompositeDisposable stageDisposables)
    {
        // Implement the processing when entering the stage here.
        // Add to stageDisposables the objects you want to dispose of when exiting the stage.
    }

    protected override void OnStageExiting(StageName stageName)
    {
        // Implement the process for exiting the stage here.
    }
}
Basic structure
For each scene, create a GameObject with the following asset name.
- Scope
- An empty GameObject to attach the LifetimeScope of the VContainer
- View
- An empty GameObject to attach a View
- (arbitrary name)
- Screen/Space scene
- GameObjects such as UI of the screen or 3D objects in space
- Control scene
- GameObjects such as cameras, etc.
- Screen/Space scene
There is no need to create objects that are not necessary to realize the feature.
The objects and scripts of the avatar selection screen scene are shown below for reference.
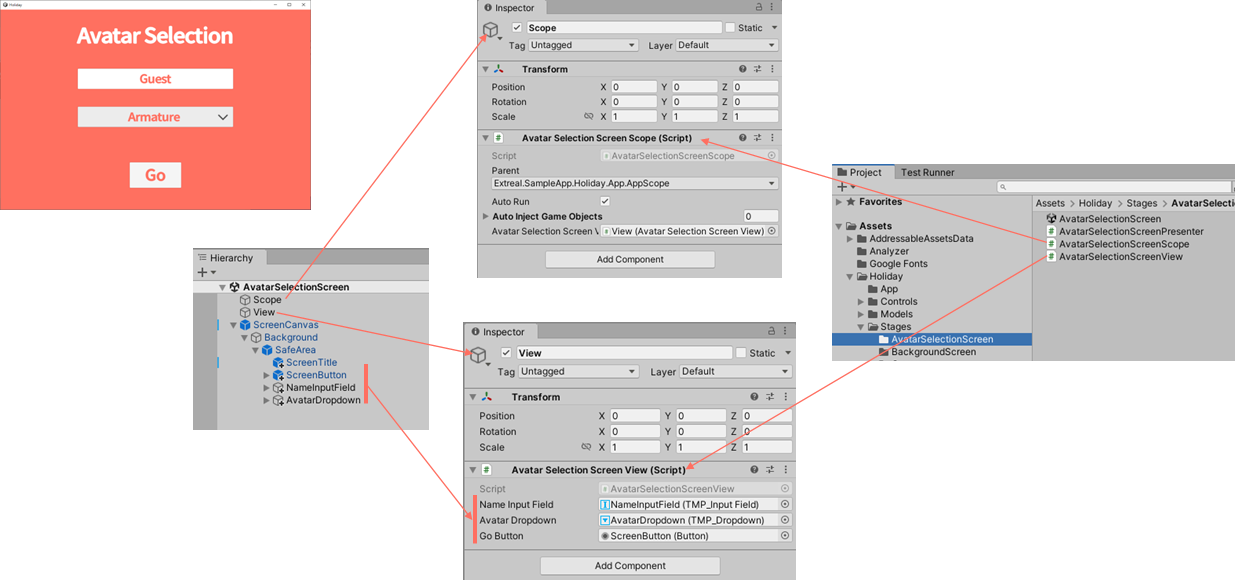
The avatar selection screen scene allows players to enter their name, select an avatar and transition to the next screen.
public class AvatarSelectionScreenScope : LifetimeScope
{
    [SerializeField] private AvatarSelectionScreenView avatarSelectionScreenView;

    protected override void Configure(IContainerBuilder builder)
    {
        builder.RegisterComponent(avatarSelectionScreenView);

        builder.RegisterEntryPoint<AvatarSelectionScreenPresenter>();
    }
}
AvatarSelectionScreenScope registers a View and a Presenter in a scope. The Presenter is registered as an entry point and serves as the starting point for scene processing. Refer to Plain C# Entry point for the timing of processing that can be used at the entry point.
public class AvatarSelectionScreenPresenter : StagePresenterBase
{
    private static readonly ELogger Logger = LoggingManager.GetLogger(nameof(AvatarSelectionScreenPresenter));

    private readonly AvatarService avatarService;
    private readonly AvatarSelectionScreenView avatarSelectionScreenView;
    private readonly AppState appState;

    public AvatarSelectionScreenPresenter
    (
        StageNavigator<StageName, SceneName> stageNavigator,
        AvatarService avatarService,
        AvatarSelectionScreenView avatarSelectionScreenView,
        AppState appState
    ) : base(stageNavigator)
    {
        this.avatarSelectionScreenView = avatarSelectionScreenView;
        this.avatarService = avatarService;
        this.appState = appState;
    }

    protected override void Initialize(
        StageNavigator<StageName, SceneName> stageNavigator, CompositeDisposable sceneDisposables)
    {
        avatarSelectionScreenView.OnNameChanged
            .Subscribe(appState.SetPlayerName)
            .AddTo(sceneDisposables);

        avatarSelectionScreenView.OnAvatarChanged
            .Subscribe(avatarName =>
            {
                var avatar = avatarService.FindAvatarByName(avatarName);
                appState.SetAvatar(avatar);
            })
            .AddTo(sceneDisposables);

        avatarSelectionScreenView.OnGoButtonClicked
            .Subscribe(_ => stageNavigator.ReplaceAsync(StageName.VirtualStage).Forget())
            .AddTo(sceneDisposables);
    }

    protected override void OnStageEntered(StageName stageName, CompositeDisposable stageDisposables)
    {
        var avatars = avatarService.Avatars;
        if (appState.Avatar.Value == null)
        {
            appState.SetAvatar(avatars.First());
        }

        var avatarNames = avatars.Select(avatar => avatar.Name).ToList();
        avatarSelectionScreenView.Initialize(avatarNames);

        avatarSelectionScreenView.SetInitialValues(appState.PlayerName.Value, appState.Avatar.Value.Name);

        if (Logger.IsDebug())
        {
            Logger.LogDebug($"player: name: {appState.PlayerName.Value} avatar: {appState.Avatar.Value.Name}");
        }
    }

    protected override void OnStageExiting(StageName stageName)
    {
    }
}
Presenter injects Views and Models and performs View and Model processing mapping and stage transitions. Since the App scene scope is specified as the parent of the scope, StageNavigator and AppState managed by the App scene can be set and used.
public class AvatarSelectionScreenView : MonoBehaviour
{
    [SerializeField] private TMP_InputField nameInputField;
    [SerializeField] private TMP_Dropdown avatarDropdown;
    [SerializeField] private Button goButton;

    private readonly List<string> avatarNames = new List<string>();

    public void Initialize(List<string> avatarNames)
    {
        this.avatarNames.Clear();
        this.avatarNames.AddRange(avatarNames);
        avatarDropdown.options =
            this.avatarNames.Select(avatarName => new TMP_Dropdown.OptionData(avatarName)).ToList();
    }

    public void SetInitialValues(string name, string avatarName)
    {
        nameInputField.text = name;
        avatarDropdown.value = avatarNames.IndexOf(avatarName);
    }

    public IObservable<string> OnNameChanged =>
        nameInputField.onEndEdit.AsObservable().TakeUntilDestroy(this);

    public IObservable<string> OnAvatarChanged =>
        avatarDropdown.onValueChanged.AsObservable()
            .TakeUntilDestroy(this).Select(index => avatarNames[index]);

    public IObservable<Unit> OnGoButtonClicked => goButton.OnClickAsObservable().TakeUntilDestroy(this);
}
View initializes the avatar pull-down, sets initial values for input items and notifies input item events.
UI
Font
Noto Sans Japanese has already been imported and set as the default for TextMesh Pro. Please use Noto Sans Japanese font.
Resolution
The resolution will be based on the generic size of 1920x1080. PC is assumed to be used at 1920x1080 and mobile at 1080x1920 in portrait mode. Add 1080x1920 to the GameView resolution and check the two sizes on the Unity editor.
Modularization
UIs that share a common design, such as screens and buttons, should be standardized for ease of maintenance. Use Unity's Prefab for UI commonization. If you have added a Prefab, please add it below.
Path of Prefab
Assets/Holiday/Stages/Common
- ScreenCanvas
- Canvas for screen
- Includes background color specification and SafeArea support
- Place the screen UI under the SafeArea
- ScreenTitle
- Title for the screen
- Contains font and character settings
- ScreenButton
- Button for the screen
- Contains font and character settings
- SpaceCanvas
- Canvas for space
- Contains SafeArea support
- Place the screen UI under the SafeArea
- SpaceTitle
- Title for the space
- Contains font and character settings
- SpaceButton
- Button for space
- Contains font and character settings
Canvas
Specify SortOrder for the Canvas of common screens that are superimposed on a screen or space, such as background screens and loading screens, so that they are displayed in the front.