Core
In this section, you will learn about Core.
- Approximate learning time
- 60 min
- Unity Version
- 2022.3.17f1
You will start by creating a project and introducing Core features, as well as VContainer and UniRx, to build the application architecture assumed by Extreal.
Create project
First, let's create a project.
Create a new project from Unity Hub.
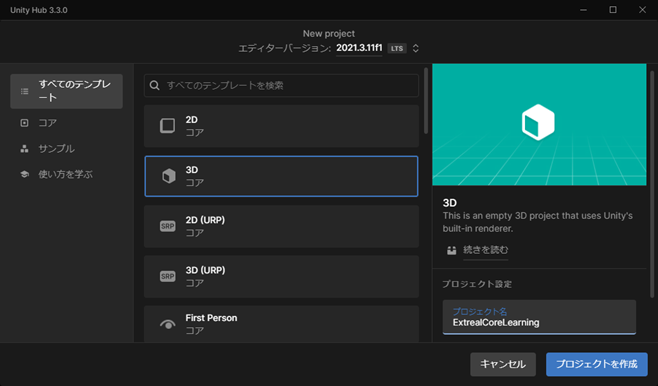
- Editor version:
2022.3.17f1 - Template:
3D - Project name:
ExtrealCoreLearning
Once the Unity editor starts, run it to make sure there are no problems.
Let's run SampleScene. Since nothing is placed in the scene, nothing will happen. If nothing appears in the Console, it is a successful.
Create entry point
Create a directory for the application and an App scene to serve as the entry point.
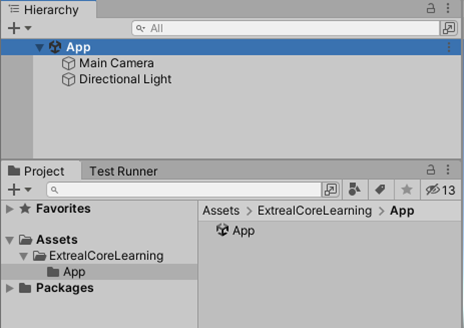
- Remove the initial
Assets/Scenesdirectory - Create a directory that will become
Assets/ExtrealCoreLearning/App - Create an
Appscene in theAppdirectory
Add Logging
Add Logging to the application.
Add Logging from Package Manager.
Add Logging by specifying a Git URL. Git URL is obtained from Package of Logging.
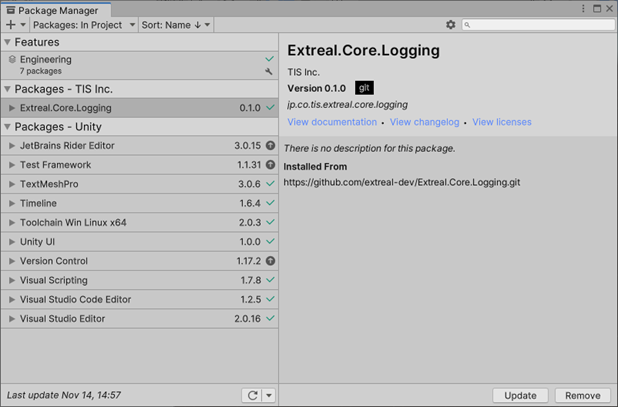
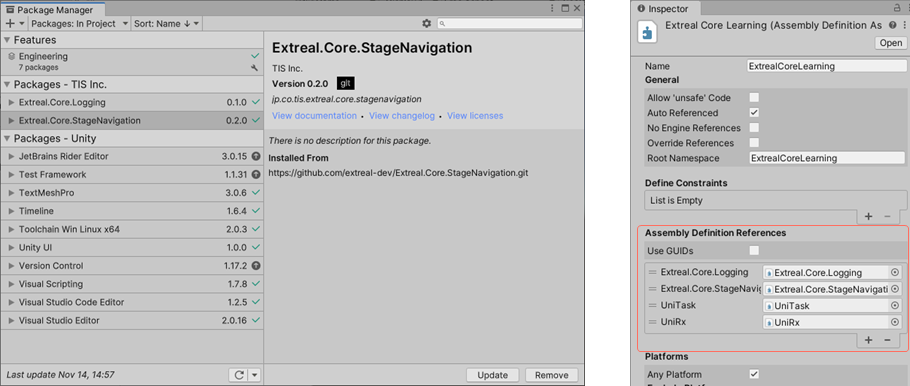
If Extreal.Core.Logging is added to Package Manager, it is successful.
The version depends on the timing of implementation.
Allow scripts to reference Logging.
Set Logging to Assembly Definition for the application.
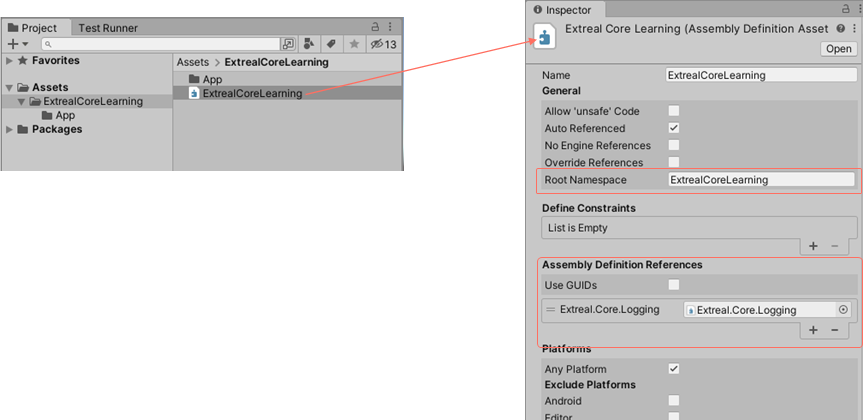
- Create an Assembly Definition named
ExtrealCoreLearningin the ExtrealCoreLearning directory - Specify
ExtrealCoreLearningas the Root Namespace - Add
Extreal.Core.Loggingto the Assembly Definition References - Uncheck
Use GUIDsin Assembly Definition References
Add a Logging setting since we want to output Debug-level logs for development.
Since the default logging level for Logging is Info, add Logging Settings to change the logging level.
Create an AppTest script in the App scene by referring to Logging Settings.
- Create an AppTest script in the App directory
- Create a GameObject with the AppTest script attached in the App scene
using Extreal.Core.Logging;
using UnityEngine;

namespace ExtrealCoreLearning.App
{
    public class AppTest : MonoBehaviour
    {
        private static void InitializeApp()
        {
            const LogLevel logLevel = LogLevel.Debug;
            LoggingManager.Initialize(logLevel: logLevel);
        }

        private void Awake()
        {
            InitializeApp();
        }
    }
}
Since it is not possible to check the operation of Logging as it is, add processing so that logging is output immediately after initialization of Logging.
private static void InitializeApp()
{
    const LogLevel logLevel = LogLevel.Debug;
    LoggingManager.Initialize(logLevel: logLevel);

    var logger = LoggingManager.GetLogger(nameof(AppTest));
    if (logger.IsDebug())
    {
        logger.LogDebug("Hello, world!");
    }
}
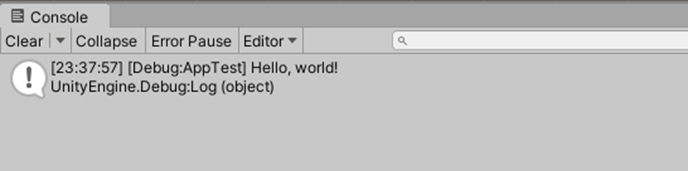
Run the App scene.
If the Console outputs Hello, world!, it is successful.
Add Stage Navigation
Add Stage Navigation to the application.
UniTask and UniRx are provided by OpenUPM, so add OpenUPM settings.
Go to Edit -> Project Settings... -> Package Manager and add OpenUPM to Scoped Registries.
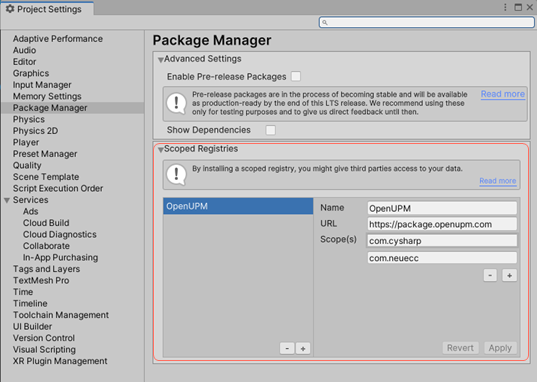
- Name:
OpenUPM - URL:
https://package.openupm.com - Scope(s):
- UniTask
com.cysharp - UniRx
com.neuecc
- UniTask
Now that UniTask and UniRx have been added, make Stage Navigation available from the script.
Stage Navigation depends on Common, so add Common as well.
Operate the Package Manager and Assembly Definition in the same manner as for Logging. The Git URLs for Common and Stage Navigation are obtained from Package for Common and Package for Stage Navigation. Also set UniTask and UniRx in Assembly Definition.
To test the stage navigation, let's add a title screen and transition to the title screen immediately after launching the app.
First, add a title screen.
- Create a
TitleScreendirectory in the same hierarchy as the App directory - Create a
TitleScreenscene in it - Remove the default GameObjects such as the camera from the TitleScreen scene and make the scene empty
- Add a
Canvasto the scene. In the inspector, make the following settings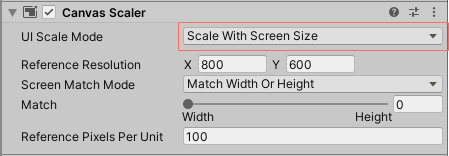
- Canvas Scaler
- UI Scale Mode:
Scale With Screen Size
- UI Scale Mode:
- Canvas Scaler
- Add an
Imageunder the Canvas. Make the following settings in theImage's inspector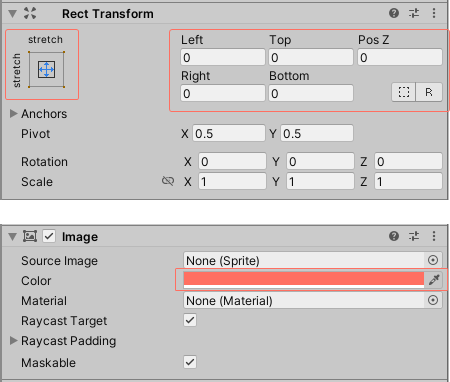
- Rect Transform
- Anchor Presets
- X:
stretch - Y:
stretch
- X:
- All from Left to Buttom are
0 (Zero)
- Anchor Presets
- Image
- Color
- Hexadecimal:
FF6F61
- Hexadecimal:
- Color
- Rect Transform
- Add
Text - TextMeshProunderImage- Create a title
Extreal Core Learning - You can decide the size and position freely
- When the TMP Importer appears, select
Import TMP Essentials. Only the first time you use TextMeshPro, the TMP Importer will appear. Once imported, close the TMP Importer
- Create a title
- Add
Button - TextMeshProunder Image- Create a button called
Go - You can decide the size and position of this button freely as well
- Create a button called
Now that the title screen has been added, create the stage settings.
Refer to Settings for Stage Navigation to create stage settings. The three types to be created in the stage settings are placed in the App directory.
public enum StageName
{
    TitleStage = 0,
}
public enum SceneName
{
    TitleScreen = 100,
}
Once the three types have been created, create a StageConfig object.
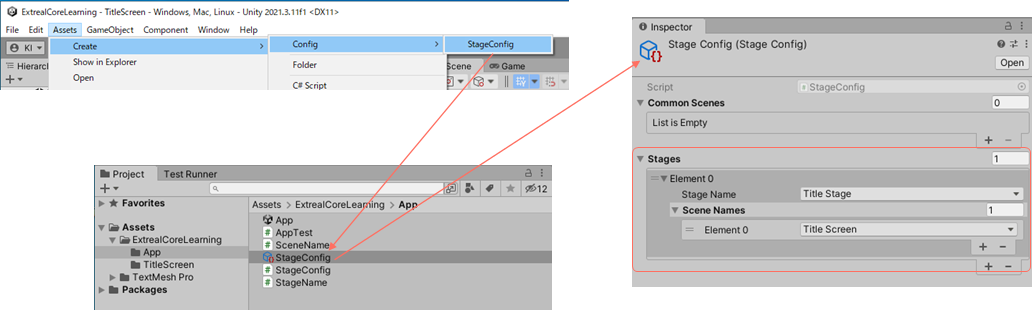
- Create a
StageConfigobject in the App directory from the Assets menu - Set the stage of the title screen in the StageConfig object
Now that the stage transition is ready, add a processing to make the transition to the title screen immediately after the application is launched.
- Add the SerializeField and Start method to the AppTest script
- Specify the StageConfig object in the inspector
using Extreal.Core.Logging;
using Extreal.Core.StageNavigation;
using UnityEngine;

namespace ExtrealCoreLearning.App
{
    public class AppTest : MonoBehaviour
    {
        private static void InitializeApp()
        {
            // Omitted due to no changes
        }

        private void Awake()
        {
            // Omitted due to no changes
        }

        [SerializeField] private StageConfig stageConfig;

        private void Start()
        {
            var stageNavigator = new StageNavigator<StageName, SceneName>(stageConfig);
            stageNavigator.ReplaceAsync(StageName.TitleStage);
        }
    }
}
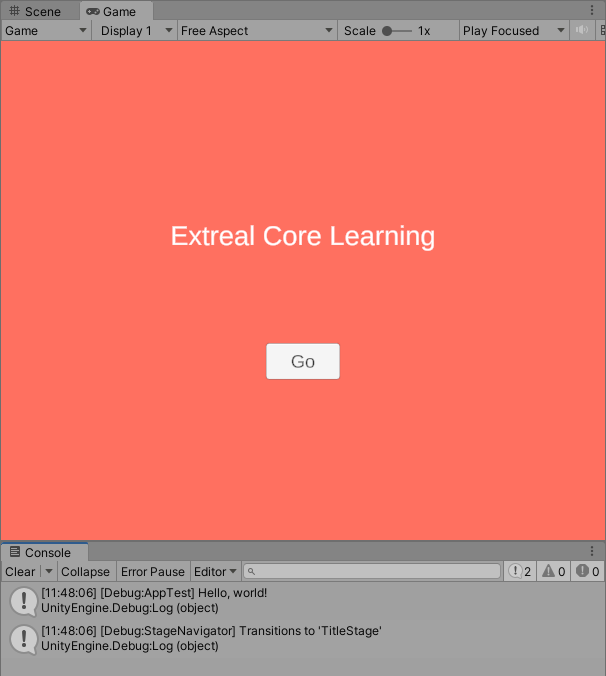
Let's run the App scene.
Running the App scene in this state will result in the following error.

Add a TitleScreen scene to Scenes In Build in Build Settings.
Let's run the App scene again.
If the title screen appears and the Console shows [Debug:StageNavigator] Transitions to 'TitleStage', it is successful.
Apply MV(R)P pattern
That is all the Core features that Extreal provides, but we would like to add VContainer to get closer to the application architecture assumed by Extreal.
Add an avatar selection screen to which the title screen transitions.
The avatar selection screen is only used as a transition destination, so it is created by copying the title screen.
![]()
- Create an
AvatarSelectionScreendirectory in the same hierarchy as the App directory - Create an
AvatarSelectionScreenscene in it - Remove the default GameObjects such as the camera in the AvatarSelectionScreen scene and make the scene empty
- Copy the Canvas and EventSystem from the TitleScreen scene and paste them into the AvatarSelectionScreen scene
- Change the title to
Avatar Selection
Then add the stage settings.
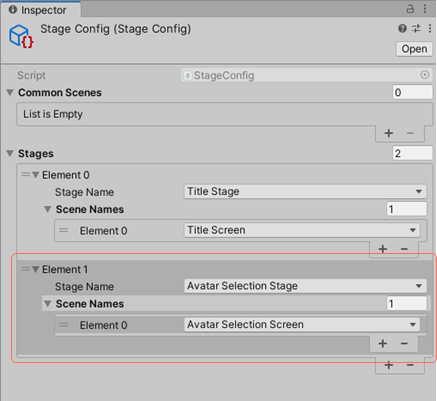
- Add
AvatarSelectionStageto StageName andAvatarSelectionScreento SceneName - Add
AvatarSelectionStagein the StageConfig object inspector
Add the AvatarSelectionScreen scene to Scenes In Build in Build Settings.
The UI and stage settings are ready.
Add VContainer to your application.
VContainer is obtained from OpenUPM as well as UniTask and UniRx.
Go to Edit -> Project Settings... -> Package Manager and add the Scope(s) from OpenUPM.
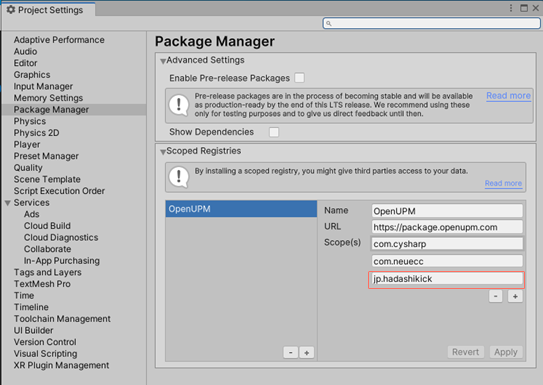
- VContainer:
jp.hadashikick
Then add VContainer to Package Manager and Assembly Definition.
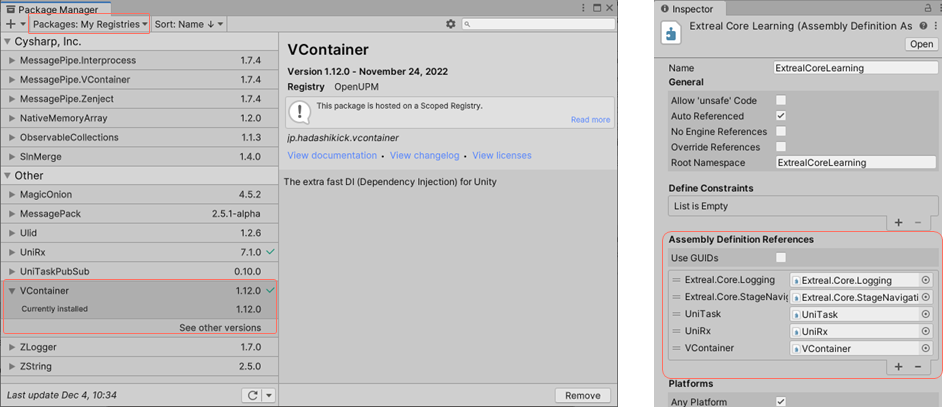
- Select Packages:
My Registriesin Package Manager and install VContainer - Set VContainer to Assembly Definition of the application
Now you can use VContainer.
VContainer
Rebuild the AppTest created for confirmation using VContainer.
First, create a Presenter script as an entry point.
Create it in the App directory. When the App scene starts, make the transition to the title screen.
using System.Threading;
using Cysharp.Threading.Tasks;
using Extreal.Core.StageNavigation;
using VContainer.Unity;

namespace ExtrealCoreLearning.App
{
    public class AppPresenter : IAsyncStartable
    {
        private StageNavigator<StageName, SceneName> stageNavigator;

        public AppPresenter(StageNavigator<StageName, SceneName> stageNavigator)
        {
            this.stageNavigator = stageNavigator;
        }

        public async UniTask StartAsync(CancellationToken cancellation)
        {
            await stageNavigator.ReplaceAsync(StageName.TitleStage);
        }
    }
}
Next, create a Scope script as a LifetimeScope for VContainer.
Create it in the App directory. Override Awake in the Scope script to configure Logging before VContainer processing.
using Extreal.Core.Logging;
using Extreal.Core.StageNavigation;
using UnityEngine;
using VContainer;
using VContainer.Unity;

namespace ExtrealCoreLearning.App
{
    public class AppScope : LifetimeScope
    {
        [SerializeField] private StageConfig stageConfig;

        private static void InitializeApp()
        {
            const LogLevel logLevel = LogLevel.Debug;
            LoggingManager.Initialize(logLevel: logLevel);

            var logger = LoggingManager.GetLogger(nameof(AppScope));
            if (logger.IsDebug())
            {
                logger.LogDebug("Hello, world!");
            }
        }

        protected override void Awake()
        {
            InitializeApp();
            base.Awake();
        }

        protected override void Configure(IContainerBuilder builder)
        {
            builder.RegisterComponent(stageConfig).AsImplementedInterfaces();
            builder.Register<StageNavigator<StageName, SceneName>>(Lifetime.Singleton);

            builder.RegisterEntryPoint<AppPresenter>();
        }
    }
}
StageConfig, StageNavigator and AppPresenter as entry points are registered. With this registration, StageConfig is set to StageNavigator and StageNavigator is set to AppPresenter. In this way, the DI container provided by VContainer is used to build up the object structure so that each object can execute processing.
Set the Scope script to the App scene.

- Create a GameObject with the AppScope script attached to the App scene with the name
Scope. - Set the StageConfig object in the inspector
- Remove the AppTest script and the GameObject with the AppTest script attached in the App scene as they are no longer needed
Run the App scene. If the title screen and Console log output appear as before, it is successful.
UniRx
Implement the Go button on the title screen using UniRx.
Create a View script for the title screen.
Create it in the TitleScreen directory.
using System;
using UniRx;
using UnityEngine;
using UnityEngine.UI;

namespace ExtrealCoreLearning.TitleScreen
{
    public class TitleScreenView : MonoBehaviour
    {
        [SerializeField] private Button goButton;

        public IObservable<Unit> OnGoButtonClicked
            => goButton.OnClickAsObservable().TakeUntilDestroy(this);
    }
}
This defines OnGoButtonClicked, which notifies an event when the Go button is pressed using UniRx.
Next, create a Presenter script that will transition to the avatar selection screen when the Go button is pressed.
Create it in the TitleScreen directory.
using Cysharp.Threading.Tasks;
using Extreal.Core.Common.System;
using Extreal.Core.StageNavigation;
using ExtrealCoreLearning.App;
using UniRx;
using VContainer.Unity;

namespace ExtrealCoreLearning.TitleScreen
{
    public class TitleScreenPresenter : DisposableBase, IInitializable
    {
        private StageNavigator<StageName, SceneName> stageNavigator;

        private TitleScreenView titleScreenView;

        private CompositeDisposable compositeDisposable = new CompositeDisposable();

        public TitleScreenPresenter(StageNavigator<StageName, SceneName> stageNavigator,
            TitleScreenView titleScreenView)
        {
            this.stageNavigator = stageNavigator;
            this.titleScreenView = titleScreenView;
        }

        public void Initialize()
        {
            titleScreenView.OnGoButtonClicked.Subscribe(_ =>
            {
                stageNavigator.ReplaceAsync(StageName.AvatarSelectionStage).Forget();
            }).AddTo(compositeDisposable);
        }

        protected override void ReleaseManagedResources()
        {
            compositeDisposable?.Dispose();
        }
    }
}
This maps the event notification of the Go button to the transition to the avatar selection screen.
It is recommended that a class that disposes implement the Dispose Pattern. To apply the Dispose Pattern, TitleScreenPresenter inherits from the DisposableBase class provided by Common and implements the managed resources release processing in the ReleaseManagedResources method. Please refer to Common for details on how to apply the Dispose Pattern.
Last, create a Scope script that ties the View and Presenter together.
Create it in the TitleScreen directory.
using UnityEngine;
using VContainer;
using VContainer.Unity;

namespace ExtrealCoreLearning.TitleScreen
{
    public class TitleScreenScope : LifetimeScope
    {
        [SerializeField] private TitleScreenView titleScreenView;

        protected override void Configure(IContainerBuilder builder)
        {
            builder.RegisterComponent(titleScreenView);

            builder.RegisterEntryPoint<TitleScreenPresenter>();
        }
    }
}
Set the View and Scope scripts to the TitleScreen scene.
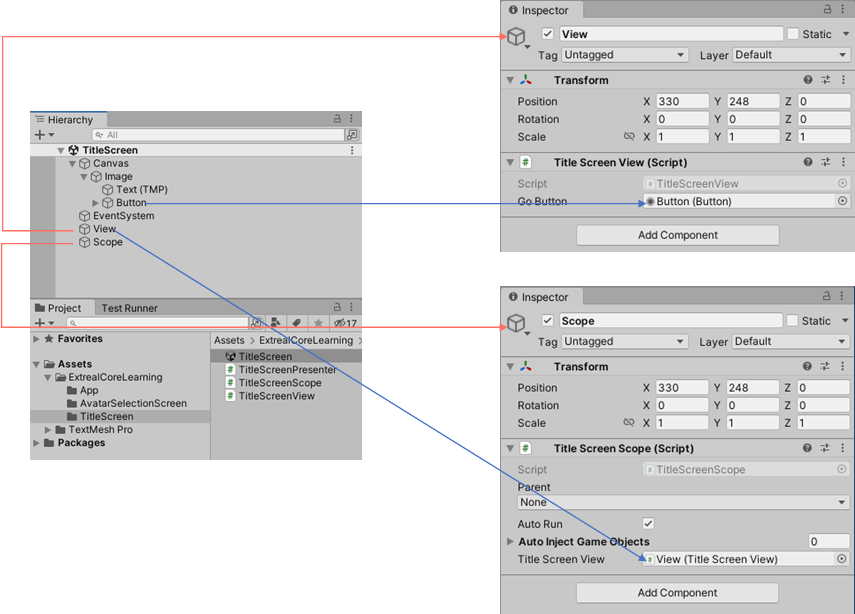
- Create a GameObject with the TitleScreenView script attached to the TitleScreen scene with the name
View - Set up a Button object in the inspector
- Create a GameObject with the TitleScreenScope script attached to the TitleScreen scene with the name
Scope - Set the View object in the inspector
Let's run the App scene.
If you run the App scene in this state, you will get the following error.
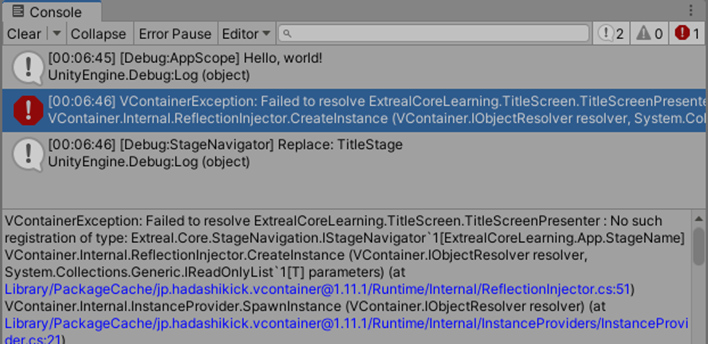
StageNavigator is set to TitleScreenPresenter, but it is not registered in the scope, resulting in the error. This error occurs because StageNavigator is in AppScope and TitleScreenPresenter is in TitleScreenScope, which are different scopes.
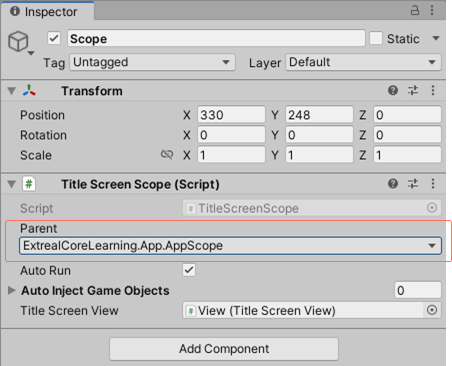
In VContainer, you can specify the parent of a scope to extend the object's search range to the parent. Specifying AppScope for Parent in the TitleScreenScope inspector resolves this error.
In this way, scopes are created with hierarchy in mind. Design the overall scope so that the commonly used scopes are more parental.
Let's run the App scene again.
If you can transition from the title screen to the avatar selection screen, it is successful.
Next Step
This concludes our hands-on with Core. Thank you for your time.
Through this hands-on, you have already built the features required for the application architecture assumed by Extreal. As a next step, you might be interested in how the architecture you built in this hands-on will be used in a more serious application. To meet your expectations, we provide Sample Application as an example of a full-scale implementation. Please take a look at Sample Application.